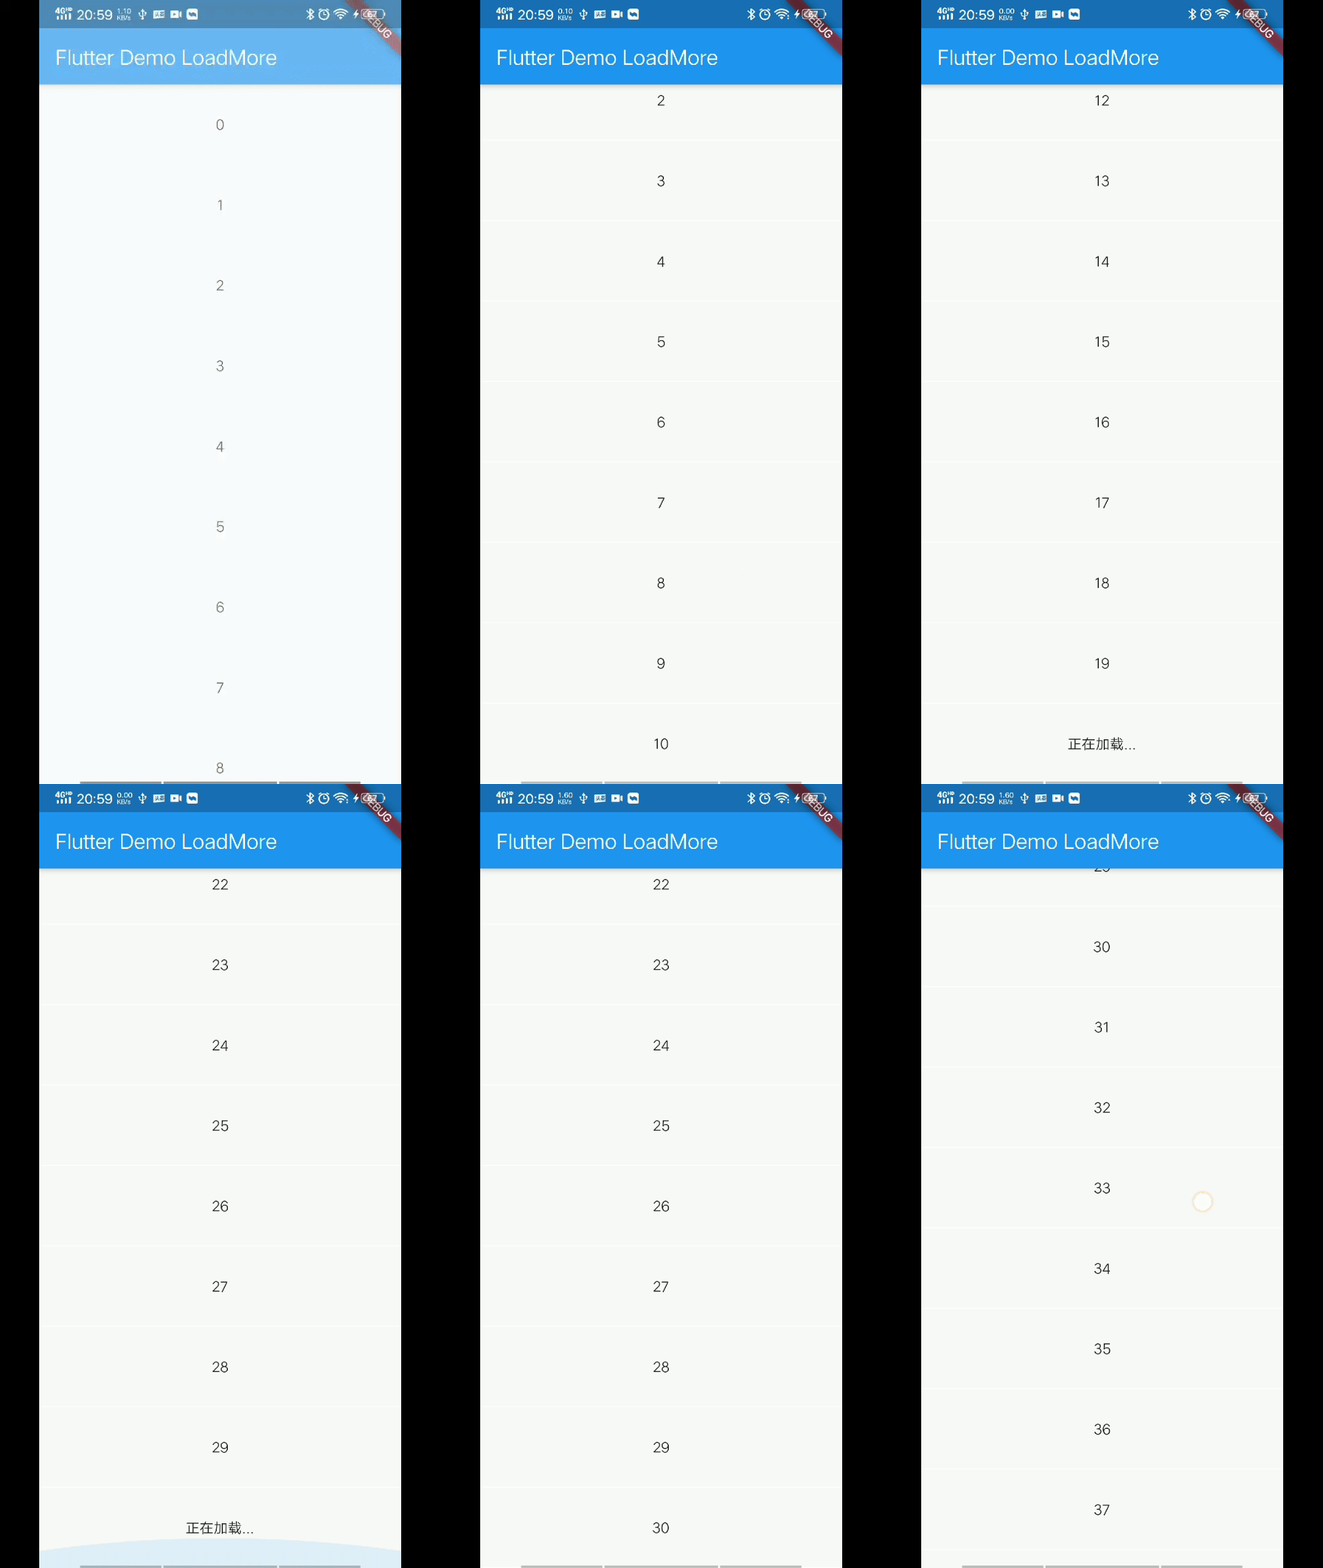
基础方式
Flutter关于加载更多最基本也是最简单的一种实现方式是:判断当ListView的构造器在开始构造最后一条布局的时候,将此布局替换为“加载更多”的布局。
首先,需要在原来的列表的item的数量上加1,为最后一项“加载更多”留个位置。
当列表滑到底部,此时“加载更多”的布局相继显示,这里就有了“加载更多”;但是这里只是完成了第一步工作,因为真正加载更多数据的能力还没有的。
接下来,还需要在构造“加载更多”布局时,触发加载更多的数据方法。
注意,加载更多的方法不能即可生效,因为这里涉及到一个知识点,正在页面渲染时不能触及页面计算,所以此时还不能直接调用setState()用于加载更多,但我们可以通过延时等待页面渲染完成后再去操作。
这样,一个最基本的加载更多就实现了。这是一般加载更多的实现方式,也是native端如RecyclerView惯用的一种方式。这种方式可以实现功能,但是并不优雅,复用性不强。
class _MyHomePageState extends State<MyHomePage> {

  var count = 10;

  // 加载更多逻辑实现
  void loadMore() {
    Future.delayed(Duration(seconds: 2), () {
      setState(() {
        count += 10;
      });
    });
  }

  @override
  Widget build(BuildContext context) {
    return Scaffold(
      appBar: AppBar(
        title: Text(widget.title),
      ),
      body: Container(
        child: ListView.builder(
          itemCount: count + 1,
          itemBuilder: _buildItem,
        ),
      ),
    );
  }

  // 构建布局
  Widget _buildItem(BuildContext context, int index) {
    // 构建“加载更多”的布局
    if (index == count) {
      loadMore();
      return Container(
        width: MediaQuery.of(context).size.width,
        height: 80,
        child: Center(child: Text('正在加载...'),),
      );
    }
    return Container(
      width: MediaQuery.of(context).size.width,
      height: 80,
      child: Center(child: Text(index.toString())),
      decoration: BoxDecoration(
          border: Border(bottom: BorderSide(width: 1, color: Colors.white))
      ),
    );
  }

}
小结
实现一个加载更多的功能主要涵盖三步:
- 构造列表底部加载更多的布局
- 给加载更多留出一个占位数+1
- 实现加载更多数据的逻辑
高阶方式
下面先列出高阶组件的使用demo,可以和上面的实现方式在使用上做下对比。
class _MyHomePageState2 extends State<MyHomePage> {

  var count = 10;

  // 加载更多逻辑实现
  Future<bool> loadMore() async {
    await Future.delayed(Duration(seconds: 2), () {
      setState(() {
        count += 10;
      });
    });
    return true;
  }

  @override
  Widget build(BuildContext context) {
    return Scaffold(
      appBar: AppBar(
        title: Text(widget.title),
      ),
      body: Container(
        // 这里增加了一层高阶组件
        child: LoadMore(
          child: ListView.builder(
            itemCount: count,
            itemBuilder: _buildItem,
          ),
          onLoadMore: loadMore,
          isNoMoreData: false,
        ),
      ),
    );
  }

  // 构建布局
  Widget _buildItem(BuildContext context, int index) {
    return Container(
      width: MediaQuery.of(context).size.width,
      height: 80,
      child: Center(child: Text(index.toString())),
      decoration: BoxDecoration(
        border: Border(bottom: BorderSide(width: 1, color: Colors.white))
      ),
    );
  }

}
对比
以上demo对比可以看出,使用低阶组件开发列表加载更多的需求和使用高阶组件开发的区别在于,开发者是否都需要关注到以上三个步骤?
| 组件类型 | 第1步(布局) | 第2步(+1) | 第3步(数据) |
|---|---|---|---|
| 低阶组件 | ✔️ | ✔️ | ✔️ |
| 高阶组件 | - | - | ✔️ |
高阶组件已经为开发者做好了前两步的工作,并将这两步逻辑完全封装了起来,与原生组件在层级上完全隔离,不依赖具体原生组件的实现,充分做到了可复用;同时提供了最简洁的接口使用,易读性和易用性都很强。
高阶组件
实现第一步,封装独立的加载更多View。
这里使用面向对象的设计思想对整个加载布局做了封装。
class LoadMoreView extends StatefulWidget {
  final LoadMoreStatus status;
  const LoadMoreView({
    Key key,
    this.status = LoadMoreStatus.idle
  }) : super(key: key);

  @override
  _LoadMoreViewState createState() => _LoadMoreViewState();
}

class _LoadMoreViewState extends State<LoadMoreView> {

  @override
  Widget build(BuildContext context) {
    // 通知:自动加载更多
    notify();
    return GestureDetector(
      behavior: HitTestBehavior.translucent,
      onTap: () {
        if (widget.status == LoadMoreStatus.fail ||
            widget.status == LoadMoreStatus.idle) {
          // 通知:重试加载更多
          RetryNotification().dispatch(context);
        }
      },
      child: Container(
        height: 80.0,
        alignment: Alignment.center,
        child: Center(child: Text(_buildText(widget.status))),
      ),
    );
  }

  void notify() async {
    await Future.delayed(Duration(milliseconds: 16));
    if (widget.status == LoadMoreStatus.idle) {
      BuildNotification().dispatch(context);
    }
  }

  String _buildText(LoadMoreStatus status) {
    String text;
    switch (status) {
      case LoadMoreStatus.fail:
        text = "加载失败,请点击重试";
        break;
      case LoadMoreStatus.idle:
        text = "等待加载";
        break;
      case LoadMoreStatus.loading:
        text = "正在加载...";
        break;
      case LoadMoreStatus.noMoreData:
        text = "没有更多数据加载了";
        break;
      default:
        text = "";
    }
    return text;
  }
}
其中,对加载更多的几个状态做了枚举,定义出一个枚举类型。
enum LoadMoreStatus {
    idle, // 空闲
    loading, // 正在加载
    fail, // 加载失败
    noMoreData, // 没有更多数据
}
在构建布局时,首先向父级派发一个自动加载更多数据的通知,此处定义为class BuildNotification extends Notification {}
在处于空闲或失败状态时,监听点击事件,从而向父级派发一个重试加载更多数据的通知,此处定义为class RetryNotification extends Notification {}
实现第二步,把父级也封装起来,形成一个高阶组件。
高阶组件接收加载更多数据的通知,同时包含一个内部加载更多的组件和一个外部传入的列表组件。
class LoadMore extends StatefulWidget {

  final ListView child;

  final OnLoadMoreCallback onLoadMore;

  final bool isNoMoreData;

  const LoadMore({
    Key key,
    @required this.child,
    @required this.onLoadMore,
    this.isNoMoreData = false,
  }) : assert (child != null), super(key: key);

  @override
  _LoadMoreState createState() => _LoadMoreState();
}

class _LoadMoreState extends State<LoadMore> {

  LoadMoreStatus status = LoadMoreStatus.idle;

  Widget get child => widget.child;

  @override
  Widget build(BuildContext context) {
    if (widget.onLoadMore == null) {
      return child;
    }
    return _buildListView(child);
  }

  Widget _buildListView(ListView listView) {
    var delegate = listView.childrenDelegate;
    outer:
    if (delegate is SliverChildBuilderDelegate) {
      SliverChildBuilderDelegate delegate = listView.childrenDelegate;
      if (delegate.estimatedChildCount == 0) {
        break outer;
      }
      var viewCount = delegate.estimatedChildCount + 1;
      IndexedWidgetBuilder builder = (context, index) {
        if (index == viewCount - 1) {
          return _buildLoadMoreView();
        }
        return delegate.builder(context, index);
      };

      return ListView.builder(
        itemBuilder: builder,
        addAutomaticKeepAlives: delegate.addAutomaticKeepAlives,
        addRepaintBoundaries: delegate.addRepaintBoundaries,
        addSemanticIndexes: delegate.addSemanticIndexes,
        dragStartBehavior: listView.dragStartBehavior,
        semanticChildCount: listView.semanticChildCount,
        itemCount: viewCount,
        cacheExtent: listView.cacheExtent,
        controller: listView.controller,
        itemExtent: listView.itemExtent,
        key: listView.key,
        padding: listView.padding,
        physics: listView.physics,
        primary: listView.primary,
        reverse: listView.reverse,
        scrollDirection: listView.scrollDirection,
        shrinkWrap: listView.shrinkWrap,
      );
    } else if (delegate is SliverChildListDelegate) {
      SliverChildListDelegate delegate = listView.childrenDelegate;

      if (delegate.estimatedChildCount == 0) {
        break outer;
      }

      delegate.children.add(_buildLoadMoreView());
      return ListView(
        children: delegate.children,
        addAutomaticKeepAlives: delegate.addAutomaticKeepAlives,
        addRepaintBoundaries: delegate.addRepaintBoundaries,
        cacheExtent: listView.cacheExtent,
        controller: listView.controller,
        itemExtent: listView.itemExtent,
        key: listView.key,
        padding: listView.padding,
        physics: listView.physics,
        primary: listView.primary,
        reverse: listView.reverse,
        scrollDirection: listView.scrollDirection,
        shrinkWrap: listView.shrinkWrap,
        addSemanticIndexes: delegate.addSemanticIndexes,
        dragStartBehavior: listView.dragStartBehavior,
        semanticChildCount: listView.semanticChildCount,
      );
    }
    return listView;
  }

  Widget _buildLoadMoreView() {
    if (widget.isNoMoreData == true) {
      this.status = LoadMoreStatus.noMoreData;
    } else {
      if (this.status == LoadMoreStatus.noMoreData) {
        this.status = LoadMoreStatus.idle;
      }
    }
    return NotificationListener<RetryNotification>(
      child: NotificationListener<BuildNotification>(
        child: LoadMoreView(status: status),
        onNotification: (_buildNotification) {
          if (status == LoadMoreStatus.idle) {
            loadMore();
          }
          return false;
        },
      ),
      onNotification: (_retryNotification) {
        loadMore();
        return false;
      },
    );
  }

  void _updateStatus(LoadMoreStatus status) {
    setState(() {
      this.status = status;
    });
  }

  void loadMore() {
    _updateStatus(LoadMoreStatus.loading);
    widget.onLoadMore().then((v) {
      if (v == true) {
        _updateStatus(LoadMoreStatus.idle);
      } else {
        _updateStatus(LoadMoreStatus.fail);
      }
    });
  }
}
在构建布局时,会首先判断ListView的delegate类型,根据不同类型,重新构造列表。这里有两种delegate类型,SliverChildBuilderDelegate和SliverChildListDelegate,他们分别对应着ListView的两种构造方法,所以此处针对两种类型,要区分构造。
主要的本质区别在于,它们两者对于构造item的方式不一样。这里分别做了处理,一个是如基础方式增加一个count占位;另一个因为直接获取到了List
最后,就是接受加载更多底部组件的通知消息,然后加载更多的数据进来,通过state状态更新列表,并刷新加载更多的组件状态,完成整个加载更多的过程。
总结
实现一个高阶组件的步骤:
- 需要新建一个新的组件,对原生组件进行包裹,将原生组件通过构造参数传入到新的组件中
- 为外部提供接口能力,比如加载更多,需要向外部抛一个接口出去:typedef Future
OnLoadMoreCallback(); - 将逻辑封装在新组件内,与原生组件完全分离。
- 新组件内部可以充分使用外部传入的原生组件的参数或原生组件本身,但不应该对原生组件做修改。
- 高阶组件定义:输入是一个组件,产出是一个功能更高阶的组件。